Microsprinkler Evaluations
Field Self-Evaluation of Microsprinkler Systems

Prior to evaluating the microsprinkler system
The microsprinkler sampling and pressure measurements should be taken when the microsprinkler system is operating optimally. Filters should be backwashed or cleaned, pipelines and lateral lines should be flushed, pressure regulators should be checked and adjusted (if needed), and any other necessary steps taken to ensure that the system is operating well.
Pressure measurements
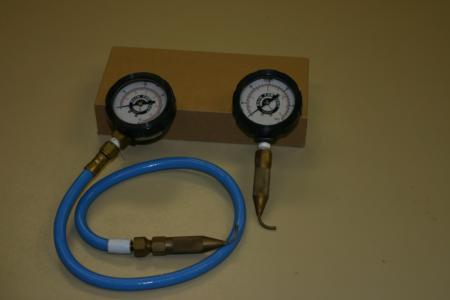
Take water pressure measurements to give you a picture of the operating pressure throughout the microsprinkler system. Pressures should be taken from the head of the system to the system’s tail end, and at the lateral inlets and tail ends. If pressures seem to be varying significantly (greater than 10-20%) within the system, more measurements are warranted. Consistent pressures within the system allow you to minimize measurements.
Elevation change within the system will affect operating pressures. An elevation change of 2.3 feet will cause a 1 psi change in pressure. Make sure to gather pressure measurements in any areas where there are significant elevation differences.
Using a map, irrigation system layout plot, or written description, keep track of where each pressure measurement is collected. This information will come in very handy when it comes time to evaluate the pressure and microsprinkler discharge rate measurements.
How to take a pressure measurement

Choosing which microsprinklers to sample for discharge
The objective in selecting microsprinklers for sampling is to get measurements that are representative of all the microsprinklers in your system. This means gathering microsprinkler discharge rates from the head of the system to the tail, from the head of the laterals to their tail ends. Make sure to get samples from any location that may have a different discharge rate. For example, high or low elevation locations or known areas of high or low pressure.
Sampling microsprinklers from locations where pressure measurements were taken is a good practice. If a microsprinkler’s discharge is higher or lower than expected, the first thing to check in order to find the cause is the pressure at the microsprinkler. By coordinating pressure measurement and microsprinkler discharge measurement efforts, you can make the most of your efforts and prevent needless duplication of work.
Microsprinkler systems are often divided into irrigation blocks to minimize irrigation system costs or because water supply flow rates are limited. Take the irrigation blocks into account when you make your evaluation since it is possible that different blocks may operate at different pressures.
As a general guideline, sample five or more microsprinklers per acre. More sampling per acre will give more reliable results. If upon sampling, you notice a great deal of discharge rate variability (more than 10%) between microsprinklers, you should take additional samples from additional sites.
How to sample microsprinklers
Microsprinkler sampling is how you determine the discharge rate of each microsprinkler. The microsprinkler's discharge rate is the amount of water the microsprinkler discharges over a period of time. The units frequently used for this measurement are gallons per hour (gph) and liters per hour (lph).
The discharge rate is measured in the field by collecting discharge from microsprinklers over a particular period of time. A 1000 ml graduated cylinder works well for collecting and measuring the discharge. A sampling period of 30 seconds also works well, although some evaluators sample for a 1-minute interval. To convert the milliliters (ml) of water collected per 30 seconds into a discharge rate of gallons/hour, use the following formula.
| ml of water collected in 30 seconds | ÷ | 31.5 | = | Discharge Rate (gph) |
Keep track of the location of each pressure and discharge rate sample collected. A map or irrigation system layout plan works well for this, although a simple written description can also work. You want to know where in the system any pressure or discharge rate problems, such as microsprinkler clogging or excessive pressure differences, occur. If you reference your measurements to a map, it will be easier to refer back to the evaluation in the future.
Determining the average discharge rate
The average discharge rate is determined by summing the individual discharge rate measurements and dividing that by the number of measurements taken. For an example of calculating the Average Discharge Rate, Click here for an example of how to calculate the average discharge rate.
How do you use the average discharge rate value?
- The average discharge rate value is very useful for irrigation scheduling. When you combine the average discharge rate, converted to an average application rate, with evapotranspiration information you can determine how long to run your irrigation sets. Click here for an example.
- The average discharge rate value can help you detect clogging. Clogging is likely occurring if the average discharge rate, measured multiple times at the same period, decrease wtih time. If you are doing an irrigation evaluation when the system is new, you will have an excellent benchmark against which to compare future measurements.
It would be unusual to have a significant increase in average microsprinkler discharge rate. If this occurs, first check to make sure the most recent measurements were taken at the same operating pressure as the previous measurements.
Discharge uniformity
Some variation in discharge rate from one microsprinkler to the next is practically unavoidable. Too much variability, though, or variability that increases over time, can be a cause for concern. For more information on discharge uniformity, Click here for more information on discharge uniformity.
